[DST63304]
Andi Syahnaz Asyira (0350545)
Taylor's University
Bachelor in Fashion Design Technology (Hons)
WEEK 1
At the beginning of this semester, since it’s our first time being instructed by Miss Melina, we had an introductory briefing for the first class. Since I hadn't completed all of my toiles from the previous semester, I decided to prioritize finishing those. We were given the flexibility to use the first few weeks to complete our toiles.
One of the toiles I had been putting off was particularly large and seemed challenging. However, Miss Melina advised me to tackle it in smaller panels, She assured me that the seams would be hidden among the ruching and ruffles. Following her advice, I managed to complete the toile in three days, which was much quicker than I had anticipated.
WEEK 2
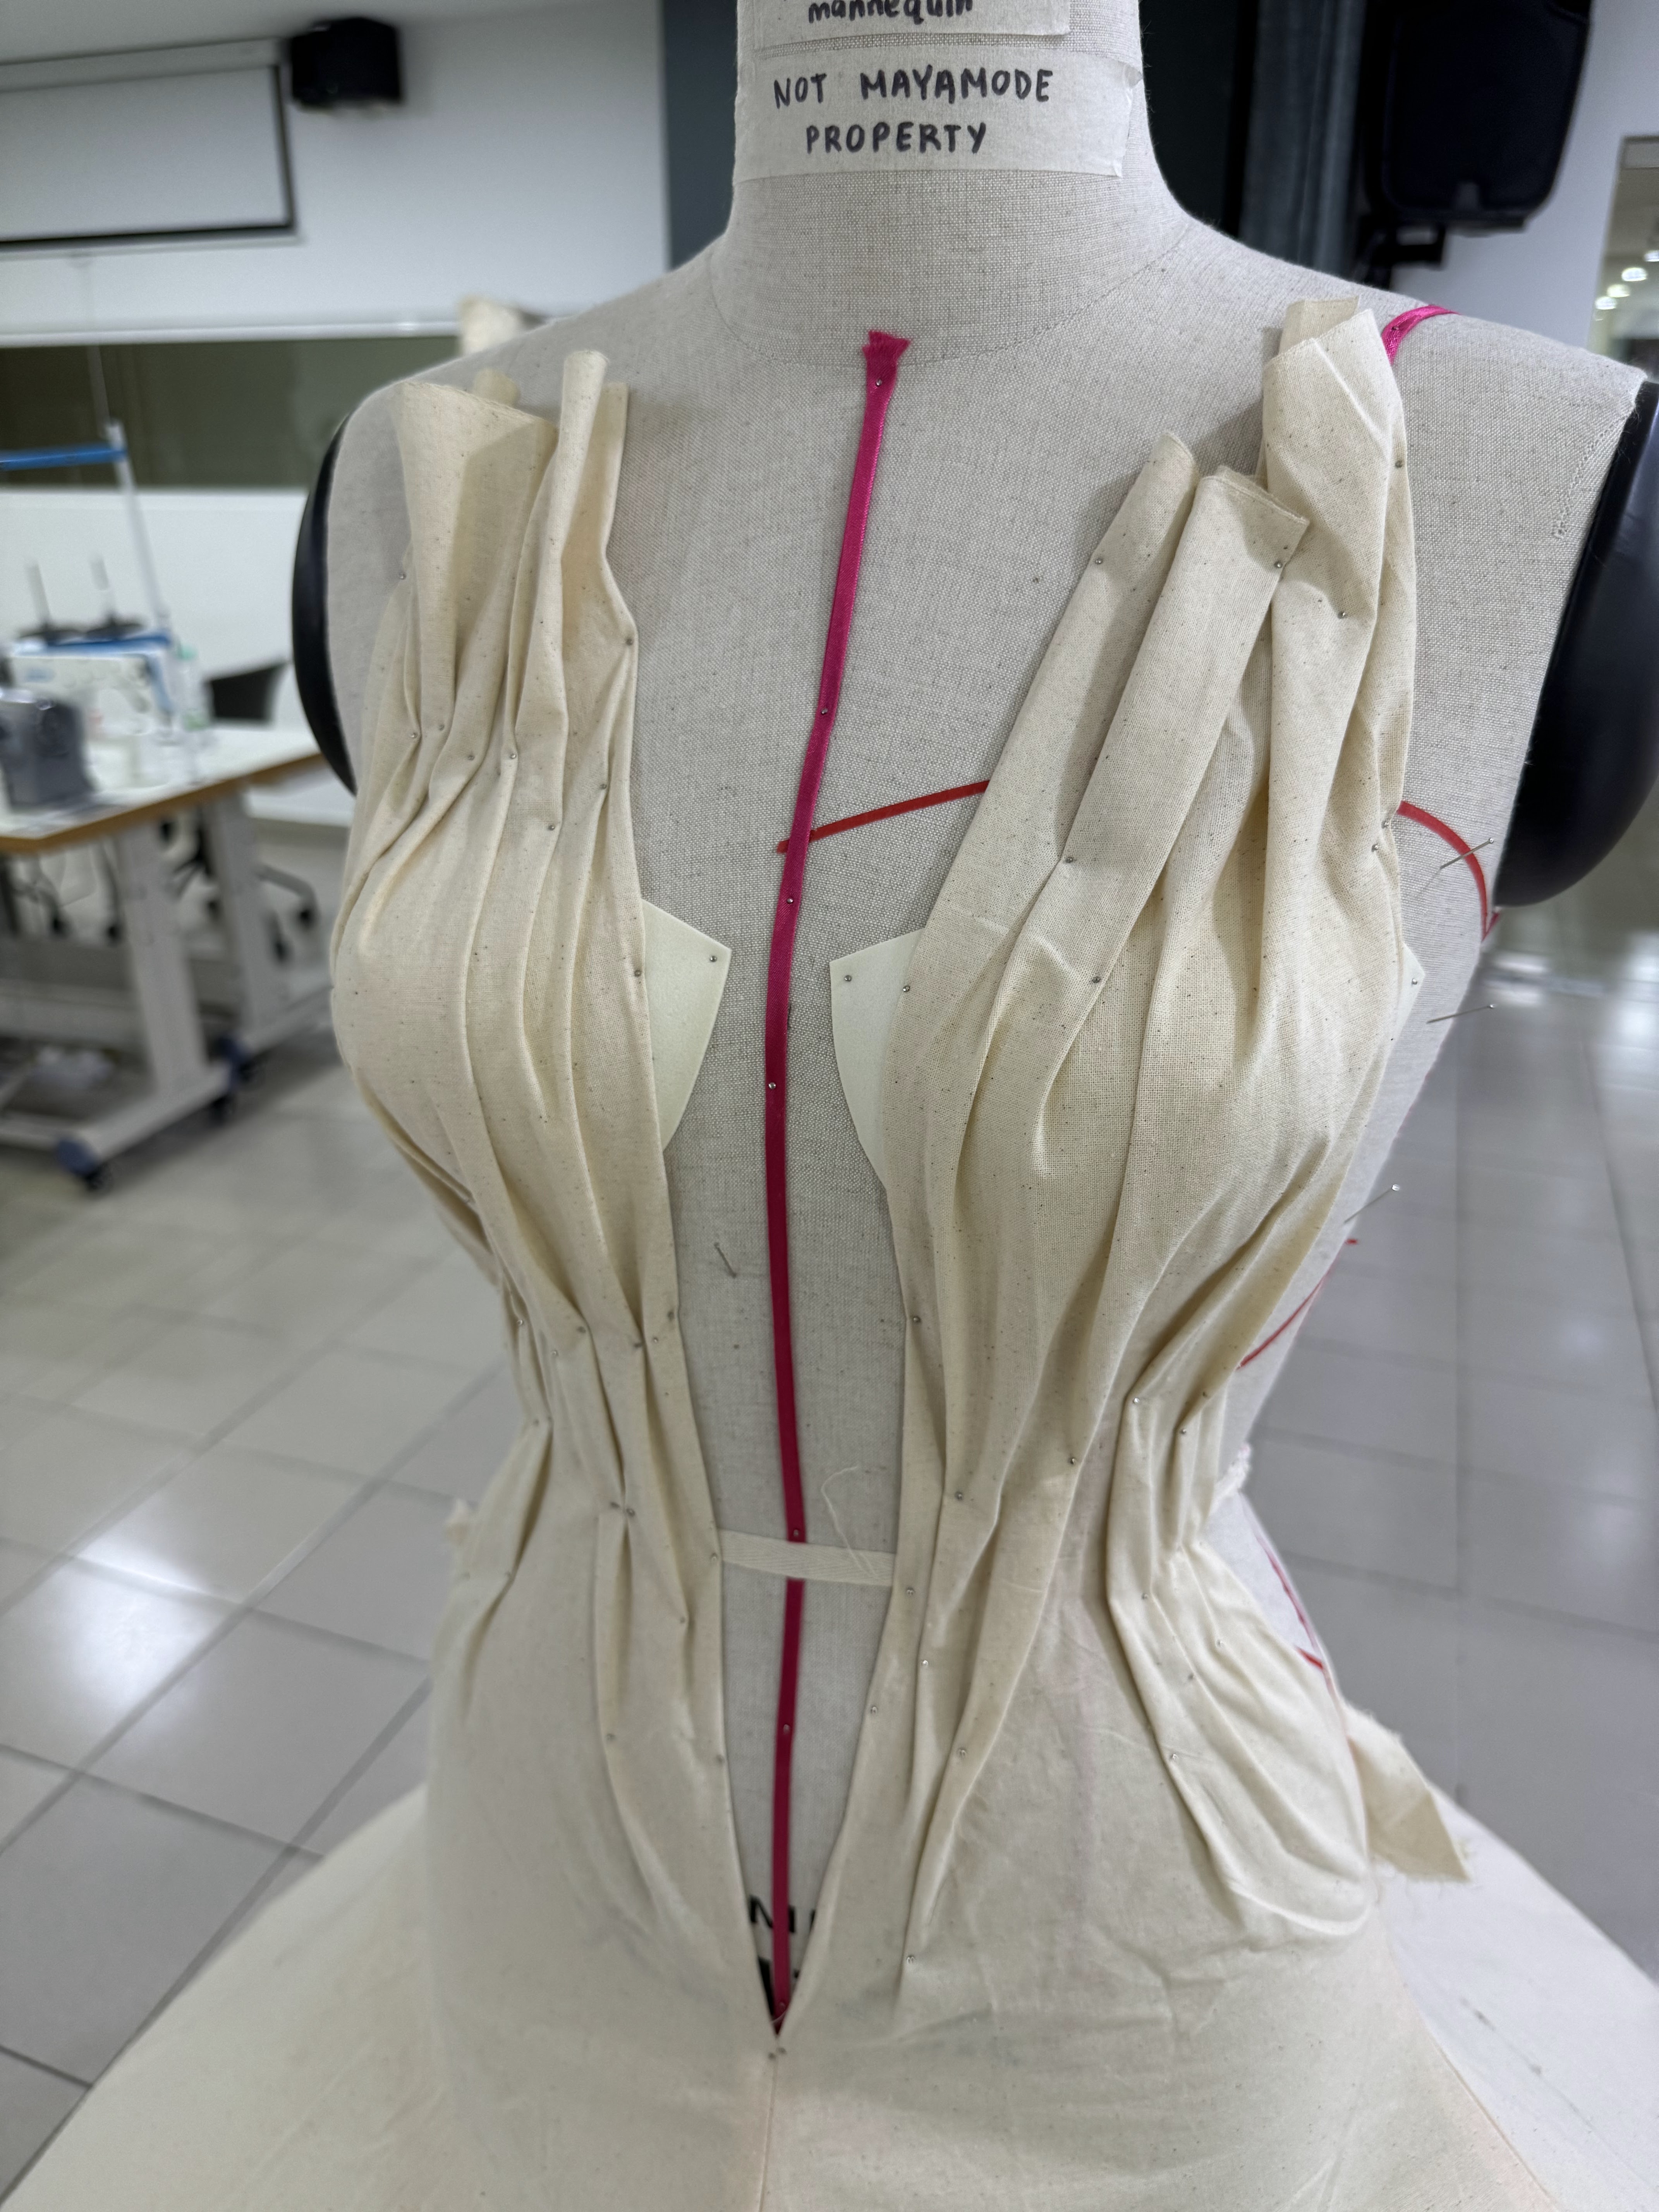
Over break, I started another toile that I hadn't finished. So this week, I decided to work on that one. This toile was quite challenging because of its complicated shape. For the actual garment, I had to reconsider several things: the shape needs to be very structured, I need a stretchy fabric that can handle the weight, and I need to find a strong yet lightweight metal to hold the structure.
I had already completed the bottom half of the base and just needed to finish the top half. This week, I started draping the top part and looking for solutions for the metal component.
I didn't have many resources to create the metal part back in my hometown, so I had to get creative and mix and match a few things. First, I tried using one layer of plastic boning, but it was too flimsy, so I added three layers. While it kept the round shape, it still folded upwards. I looked for stronger wires but couldn't find any, so I twisted the available wires to make them stronger. This held the shape, but it was a bit excessive, so I ended up ordering a heavy-duty wire used for construction work.
WEEK 3
This week, Kit informed us that we need to start sewing look 1 of our final collection. I purchased 8 meters of cotton fabric and began working on the actual garment. From my experience with the toiles, I discovered that creating the ruching was pretty straightforward and easy. So, instead of constructing small panels, I decided to use three long panels and ruch the sides.
Once I had stitched the sides to the panels, I realized that I needed to hand-stitch most of the lining, which was the part I was least looking forward to due to how time-consuming and tedious it is.
WEEK 4
This week, I finished hand-stitching the lining for look 1, which I had started last week. It took quite a while because I wanted to ensure it was securely attached and looked neat. The garment was large, making it difficult to hold in place and maneuver.
After completing look 1, I moved on to look 2. I decided to redesign the pants for this look, so I began working on the toile. The pants had a pretty unconventional shape, so I had to ensure they fit the mannequin properly. Before making the waistband, I tested the fit on the mannequin. It looked awkward, so I made some modifications and altered the shape to improve the fit.
I wasn't sure where to begin with the waistband since I didn't know how to create a pattern for a curved waistband. Initially, I tried curing the back patterns, but it didnt suit the pants' structure. Miss Melina suggested adding a yoke to back. After incorporating the yoke and waistband, the pants turned out too big again. So, I unpicked all the seams and made further alterations. After that, the pants fit the mannequin, with the waistband having a bit of ease.
(before final alteration)
WEEK 5
Since I finished my toile last week, I began working on the pants for look 2 this week. I initially wanted to use leather, but Kit advised that denim would be more suitable and have a longer shelf life. For the actual garment, instead of adding a yoke like in the toile, I made the back pieces like normal pants. I made a lot of adjustments during the toile process and didn't want to repeat those mistakes with the final fabric.
WEEK 6
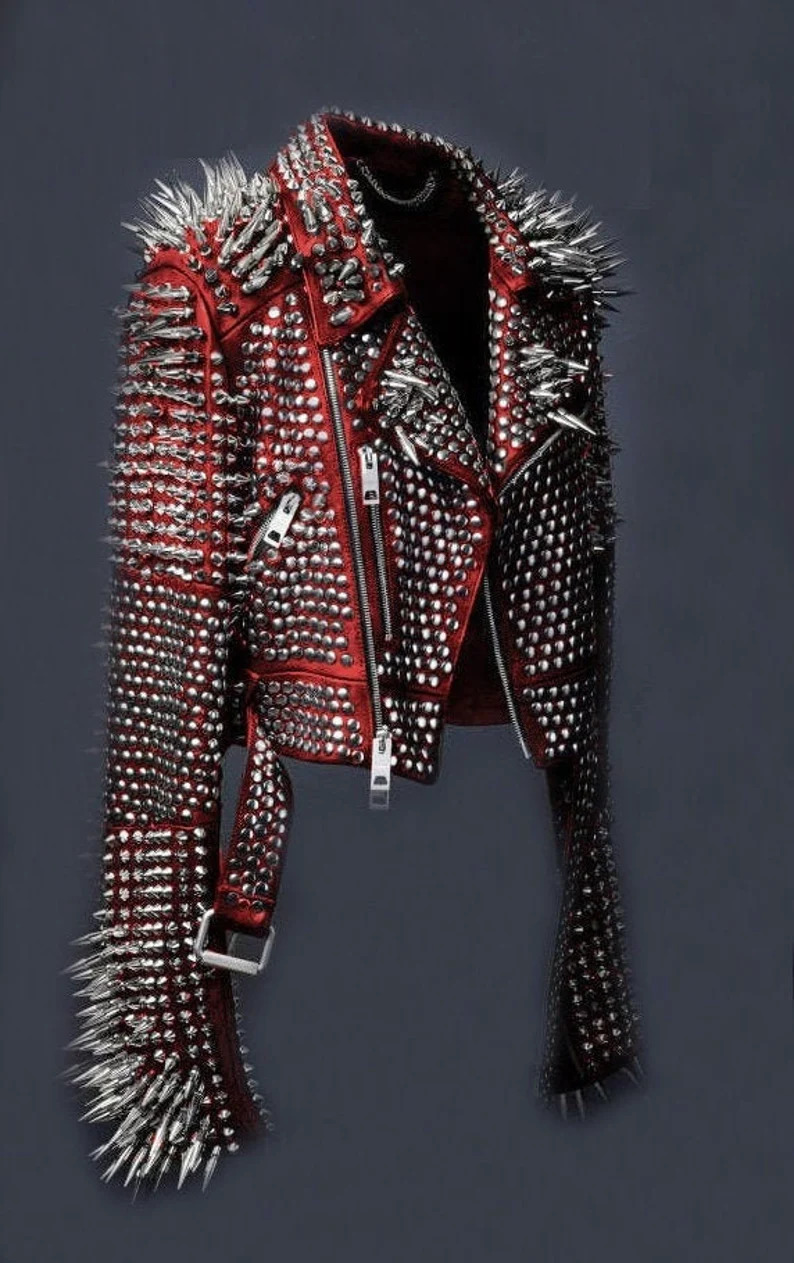
This week, I started working on the actual blazer for the second piece in my look 2, using denim for this piece as well. Inspired by a fully studded jacket, I aimed to achieve a similar effect. I ordered around 60 studs in various shapes to decide which ones I liked best. After sewing the blazer, I realized I didn't have enough studs. I decided not to attach any studs yet because I didn't want to risk making holes or placing them incorrectly, knowing I wouldn't be able to make changes later. I also haven't added the lining yet, as I plan to install all the studs first. So, for now, I've left the blazer unfinished.
(inspiration photo from Google)
WEEK 7
I didn't accomplish much sewing this week because my workload increased with assignments and reports from other modules. However, I did manage to sew the final garment for look 2, which is a sleeveless white button-up shirt using the same pattern I created last semester
WEEK 8
During Independent Learning Week, I returned to my hometown and focused on assignments for my other modules.
WEEK 9
This week, I was finally able to focus on my final project again. To make the most of my time, I started working on look 3, which features a backless dress. Since I hadn't finished the top half of the toile, I tackled that first. I made the top helmet part for the dress, focusing on the helmet/hood part because the chest section only required draping.
Kit advised me to use a stretchy fabric for a cleaner look, which meant modifying the pattern to make it slightly smaller so it could stretch to the desired size. I then cut all the patterns onto the fabric, ready to sew later.
WEEK 10
This week, I sewed the pieces for look 3 together. The process was relatively quick and straightforward. The only challenging part was figuring out how to add the wire to make the round shape stand properly. Since the fabric is stretchy, it was difficult to keep the wire in place and prevent it from overlapping. I added another stitch close to the seam to slide the wire in, which maintained the shape. However, I was concerned about whether it would stay in place with the model's movement, so I added another layer, inserting the wire from the opposite end to secure it better.
I didn't finish the top part yet because I wanted to move on to sewing a different garment. Rather than spending too much time on this one piece, I aimed to get as much of the base work done for all the looks as possible, knowing that my time was limited.
WEEK 11
I moved on to sewing look 4, which is a bolero-style jacket with pointy shoulders inspired by the shape of an electric guitar. I created the pattern last semester, so this semester, I only needed to make the actual garment. Unfortunately, I lost the pattern for the sleeves, and without time to redrape it, I hand-drew the sleeve pattern. One sleeve turned out perfect, but the other needed some adjustments. Everything worked out fine in the end.
I was about to add the lining when I decided I wanted to add studs to the jacket. So, I bought more studs online this week for the jackets from look 2 and look 4. This look includes three pieces: a jacket, a shirt, and a skirt. However, I lost the pattern for the skirt and haven't draped the shirt yet. I decided to postpone these pieces and move on to another look, planning to return to them if I have extra time later.
WEEK 12
This week, I began working on sewing look 5. When I created the toile last semester, I didn't fully consider the size of the lines in each panel or the type of fabric I would use for the final garment. For the toile, I used batting between the calico, adding extra ease because I wasn't sure how much space the batting would take up. For the actual garment, I went with neoprene. The lines looked much better, but neoprene is a bit stretchy, so it was tricky to make the lines match up and stay even.
Then, I moved on to making the round disk part. Last semester, Dr. Shaimaa didn't give much guidance on how to keep the shape, so I decided to use the same technique as the dress from look 3. This week, I started making the pattern by reworking what I did for the dress and tweaking it to get the circle to stand up the way I wanted, then I cut the pieces of the pattern for that.
WEEK 13
I continued working on the dress for look 5 this week. Last week, I sewed all the pieces to create the quilted lines, so this week I focused on assembling the pattern pieces. Matching up the lines was incredibly difficult, especially since neoprene is such a thick, plush fabric. I had to unpick each section at least 3-4 times because I couldn't get the lines right. I needed to ensure the lines were even with the quilting and make it as seamless as possible. However, as I mentioned before, the stretchy material ended up making the lines uneven, and the bust area turned out too large. Since I wasn't sure if I had enough time to start from scratch, I sewed together what I had and added lining to the top part, leaving the bottom part open because I knew I’d want to redo it later.
For the disk part, I sewed the pieces I cut last week together. I had to unpick and modify the pattern because it didn't flare the way I wanted it to. I didn't accomplish much else this week because I was feeling under the weather.
WEEK 14
At the start of this week, I was still feeling sick, so I took some time to rest to avoid overworking myself and getting worse. With the final presentation on Friday, I didn't have much time left, so I focused on finishing up some hemming and detailing for most of the garments.


Comments
Post a Comment